Showing posts with label Vegan. Show all posts

Sunday, February 28, 2016


Tomatos, Cukes & Avocados 


Do I really need to say more? Such a pretty, fresh salad.  I ate it as my main course last night and it was delicious and filing.   I did make a few changes to the recipe to try to lighten up the fat content.

Here is what you will need for my version:

1 English cucumber, peeled & diced
4 tomatoes, diced
2 avocados diced
1/2 small red onion sliced thinly
The juice of one lemon
1 Tbsp tahini
2 Tbsp white balsamic vinegar
black pepper, to taste

Mix your veggies in a large bowl. In a small bowl mix together your lemon juice, tahini & vinegar. Pour your dressing over the veggies & toss. Sprinkle with freshly ground black pepper to taste.
Serve immediately. This makes about four generous side salads or two very generous main salads. 

Notes
I subbed tahini paste, which is made from sesame seeds, for the olive oil in the recipe because, I am trying not to add oil to my food. The tahini paste is high in fat but about half the fat of olive oil. Tahini paste also has protein, fiber, calcium and iron. Here's how the two stack up:

Olive oil (Trader Joe's)
(per serving of ONE Tbsp)
120 calories, 14g of fat, 2g of saturated fat, 0 Carbs, 0 fiber, 
0 Protein

Tahini paste (Whole Foods organic) 
(per serving of TWO Tbsp)
170 calories, 16g of fat, 2g of saturated fat, 6 Carbs, 3g fiber, 5g protein. AND 10% of your daily recommended intake of calcium & iron.

So for one Tbsp of tahini, the calories are 85 & the fat is 8g. That is for the entire salad, which easily feeds at least two people. The tahini adds a rich, nutty flavor and makes the dressing very creamy. Olive oil, or any oil, for that matter is just pure fat. Oils do not bring any protein, fiber or nutrients to the dish. 

Next time I will make this with only one avocado to further lower the fat content. The addition of chick peas or beans will boost the protein content. Or better yet: Put the salad in a pita bread with some tempeh bacon. Oh the possibilities  are endless.


The original recipe was on FB. Click on this: Salad


Granola, anyone?


Peanut, raisin, chocolate chip granola.


Who doesn't love granola? 

There are a plethora of uses for the sweet,  crunchy and delectable tidbits. I have sprinkled it on my homemade soy Greek yogurt and on Trader Joe's soy vanilla ice-cream. I've even eaten it straight up out of the container. Some people claim that it is not healthy because of it's high fat & sugar content. I also struggle to find granola without nuts or sunflower oil, which are the things that I am deathly allergic to. Such a drama queen! But there is no reason for  me to despair. I can make my own, of course! 

"But why, Ellie, would I want to take 30 minutes out of my life to make it, when I can grab a bag off the shelf?" 

Here's why:

You control the quality of the ingredients: Organic  and NON-GMO or not. 

You control the amount of fat and sugar.

And my favorite reason: You can customize it to your liking. Add nuts, raisins, chocolate chips. Or don't add anything!

I have not figured out the cost per batch, but I am pretty sure it costs less to make your own.

Here's what you need:

An 8" x 8" brownie pan, or 11" x 7" pan. Lightly spray the bottom of the pan with your oil mister using vegetable, safflower or sunflower oil. Or cover the bottom of the pan with parchment paper.

Dry Ingredients:
1 1/2 cup of rolled oats (not instant)
1/2 tsp of cinnamon
1/4 tsp salt (optional)
3 Tbsp of flour (regular or gluten free) ONLY, if you are making  granola bars. I use white whole wheat flour for everything.


Your add ins. These are optional. Add one, some or none: 
1/2 cup raisins, raisins or other dried fruit
1/2 cup of almonds or peanuts or cashews
1/2 cup of chocolate chips
1 Tbsp chia seeds
1 Tbsp ground flax seeds


Wet Ingredients:
1/4 cup of packed brown sugar
1 tsp vanilla
1 1/2 Tbsp of maple syrup
2 - 6 Tbsp of oil (optional, see note below)


Directions:
Preheat oven to 350 degrees F.  Mix dry ingredients in a large bowl. Add your add ins to this bowl and stir until well combined. In a small bowl mix your wet ingredients thoroughly. Add the wet to the dry and mix well. Add to prepared pan and if you have not added any oil to the mix you can spray the top of the granola lightly with your oil mister. Bake at 350 for 20-30 minutes or until golden brown. Please stir it once after 10 minutes in the oven. Let it cool in the pan and then place in a sealed container. Will keep for at least a week, but I doubt it will last that long!


Notes:
The oil is totally optional, however if you want to make a bar that will hold together, you will need to add all of it (6 Tbsp). To make granola bars, also add the 3 Tbsp of flour to the dry ingredients. I suggest using parchment paper in your pan to make it easier to remove the entire block from the pan. When your block is totally cooled, cut into 8 individual bars.
A little bit of oil does make a yummier batch of granola, but if you are trying to avoid any added fat; the recipe works well without it.

My granola is based on this granola bar recipe, by Jamie Geller, click on the link for more ideas!


Thursday, February 25, 2016

Yogurt of the gods, Greek gods, that is....

Have you noticed how people have completely lost their minds over Greek yogurt? There are entire walls of it in the grocery stores. Whipped, low fat, add ins etc.. Everyone is getting on the Greek yogurt band wagon because it is so high in protein. But has anyone noticed how much sugar they contain? Not to mention, most of it is made with dairy milk, which I choose not to consume. My answer to that is to make my own non-dairy Greek yogurt.

The gods were looking down on me one day when they showed me the way to a Groupon listing for my yogurt maker by Dash. It was inexpensive and it came with cute little yogurt travel cups. The ones with a separate compartment for my own add-ins! Perfect!


My yogurt maker!


Incase, you were wondering: Greek yogurt is plain old yogurt that is strained. Its's strained for several hours to get it to a thicker consistency and higher protein concentration. That's it! No big mystery there.


My simple ingredients


What I love about making my own yogurt is the absolute simplicity of the ingredients and the process itself. All you need for ingredients are 5 cups of non-dairy milk and a 1/2 cup of plain non-dairy yogurt with live cultures for you "starter.' I use unsweetened, plain soy milk. The ones by West Soy a& Trader Joe's are made with soybeans and water. Period. No additives or gums. For my starter I have tried plain soy & plain coconut milk yogurt and I have had good success with both kinds.


Equipment needed are basic: 

A double boiler, or a glass bowl that sits in a pot. After a few batches, I broke down and bought a double boiler by De-buyer. It has made yogurt making much easier for me.
A food thermometer
A whisk
A yogurt maker. In all honesty, you can do with out it. Basically you need to keep your liquid at a constant temperature for a certain amount of time. But, this device was inexpensive and it features a timer, a strainer & 4 very cute yogurt containers.


The strainer included is worth it's weight in gold!


So now that you've compiled your ingredients and equipment, let's make yogurt:

Step one: take your starter yogurt out of the fridge and let it reach room temp while you prepare your non-dairy milk.

Step two: place 5 cups of non dairy milk in a double boiler or a pyrex, heat safe bowl over a pot filled with water. Over medium heat bring water up to a boil and heat "milk" until it reaches a temp of 110 degrees Farenheit. Do not let the milk boil, or your pan run out of water!or simply put your non dairy milk in a  microwave safe bowl and heat for 60 seconds at a time until temp is reached. (note that dairy milk has to be heated to 180 degrees to break down the protein chains. you do not need to do that with non dairy milks)
My make shift double boiler: pyrex bowl on top of a sauce pan
Step three: Remove milk from heat and let it cool to 100 degrees Farenheit. This will take about 5 minutes. Do not let it get any cooler than that.


Adding in my starter.
Step four: whisk in1/2 cup of plain unflavored yogurt with live cultures. You can save half a cup of your finished yogurt to use as a starter for your next batch. It is recommended that you only do that a couple of times. After that, use a commercially prepared plain yogurt, to ensure the cultures will be strong enough.

Step five: after adding starter yogurt, pour into your yogurt maker, cover and let it sit for nine to eleven hours. Non-dairy milks require more time than cow milk.

Step six: pour warm yogurt into a fine strainer or cheesecloth and let strain for 2 hour in the fridge. This will give you the thick consistency that is Greek yogurt, but here's the deal: If it's too thick for your taste add back some of the liquid. Too thin? Let it strain longer. 

Now you have about five half cup servings of plain Greek yogurt. Or four servings and one starter for your next batch. I add fruit, granola and a little maple syrup to flavor mine. It's delicious, dairy free and I control the amount of sweetness!


The finished product!
Next time I'll share my recipe for homemade granola!

Granola with & without nuts
Granola with peanuts, raisins & mini chocolate chips!


Sunday, February 5, 2012

Hummus


I am a very big fan of the chick pea and I will eat them cold in salads,  cooked in chana masala or mashed into hummus. I have to confess that this is the first time I have made my own hummus. What was I waiting for? Making your own hummus is easy to do and the end result is far superior in flavor to anything you will find in a grocery store.

Ingredients

1 can of chick peas, drained
2-5 cloves of garlic, chopped
1-2 tsps of roasted tahini paste (sesame paste)
Lemon juice (one half or one whole lemon)
Olive oil
Salt & pepper

Place chickpeas and garlic in a food processor and pulse until a thick chunky paste forms. Add tahini and lemon juice and pulse a few more times. Now run your processor on continuous and drizzle in about 1/4 cup of olive oil until your hummus has the consistency desired. Add salt and pepper to taste. Serve with fresh vegetables and or crackers.


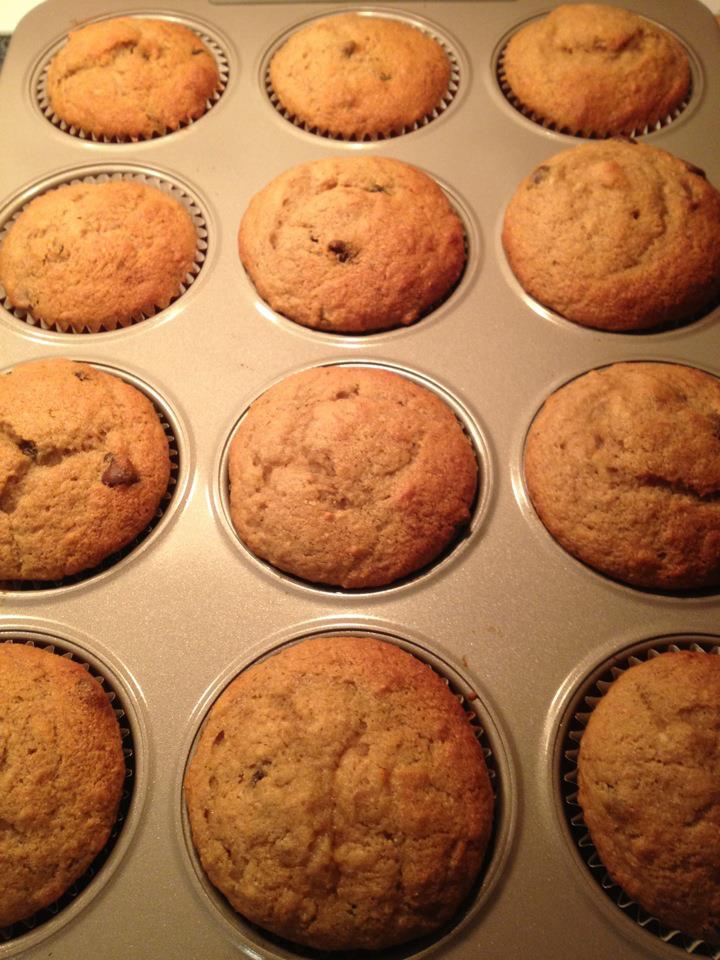
Banana Chocolate Chip Muffins


What do you do with the very ripe bananas on your counter? Make banana muffins of course! This delightful muffin is light, moist and chocolatey. The recipe comes from  my new friend Micaela, who makes them gluten free with the substitution of Bob's Red Mill gluten free all purpose flour for regular AP flour. Micaela tells me that this is a very forgiving recipe and can handle pretty much any substitution. Next time I might try using corn oil instead of the Earth Balance.

I have posted her original recipe with vegan subs in the parenthesis. Enjoy!


3 lg bananas
1 1/2 c flour 
1 c brown sugar
1/2 c butter (1 Earth Balance stick)
2 egg (2 Tbsp ground golden flaxseed mixed in 6 Tbsp water)
1/4 c sour cream (1/4 cup rice milk with a couple drops of lemon juice to sour it)
1/4 tsp salt
1 tsp vanilla
1 tsp baking soda
1 1/2 tsp baking powder
1 cup vegan chocolate chips or nuts (optional)

1. Preheat oven to 350
2. cream together butter and sugar
3. add sour cream, eggs, mashed bananas and vanilla
4. mix all dry ingredients and add to mixture
5. pour batter into greased muffin tins or lined with baking cups
6. Bake for 20-30 minutes until muffins are golden brown and spring back to the touch
7. ENJOY!!!!!


Sunday, January 29, 2012

Superbowl Munchies

Is Super Bowl coming and you don't know what to serve your vegan foodies? Do not pass Go, do not collect 200 dollars. Go immediately to The "V" Word blog and you will find the most incredible recipes for appetizers. The recipes deliver in taste and texture and the instructions are concise and easy! 


Jalapeno Poppers

The poppers are a dream come true and not really difficult at all. The most tedious part is cleaning out your peppers. Please wear gloves and do not touch your face until you are finished preparing them, have removed your gloves, and have washed your hands thoroughly. They can be baked or fried. I don't eat fried foods very often so I fried mine. A food thermometer is helpful in keeping the oil at the right temp so they have a chance to brown before the cheese explodes out of them. I found that anywhere between 320 and 350 degrees works quite well.


Seitan Spicy BBQ Ribs
 This was my first try at making seitan and I was fearful, having heard horror stories about the end result being too dry or too gummy. You will LOVE these ribs. The depth of flavor is derived from three layers:  the spice rub, the barbecue sauce made from scratch ( I will never use store bought again) and the spices in the seitan itself. Initially, I had undercooked the seitan because I was afraid it would dry out and ended up with a soft meat loaf texture. All textures aside, the taste was phenomenal: sweet, spicy and smoky. After slicing the ribs, and smothering them in the BBQ sauce; I covered them and baked them again for about 30 minutes in a 325 degree oven. They firmed up nicely. If you follow the directions to the T, you will get them right the first time. I can't wait to try the Mozzarella sticks!

Friday, January 27, 2012

Cauliflower Smash with Leeks


After a cold and rainy day here, I wanted to make some warm comfort food. Mashed potatoes came to mind but I am really trying to limit my fat & starches. The obvious second choice was mashed cauliflower. Well, maybe not so obvious to me but I knew I had a head of cauliflower in the fridge just waiting to be cooked.

For this easy and tasty recipe you will need:

One head of cauliflower,
2 leeks, sliced
Olive oil
Salt & Pepper
Vegetable stock

Remove the cauliflower florets from the core, place in a steamer, and steam until just soft. Set aside.


Slice your leeks and place in a colander. Place the colander in a large pot and fill with water until the leeks float in the colander. Raise the colander out of the pot and rinse the leeks in the colander. Dump out the water in the pot and repeat the process again to remove all of the sand. The sand should sink to the bottom of the pot each time. Having sand in my food freaks me out and reminds me of my childhood summers spent at Jones Beach, where invariably sand ended up on all of my food.


Now that your leeks are squeaky clean, let's cook them. Heat a large stock pot and add a couple tablespoons of olive oil. Cook your leeks on medium heat until they cook down. Add a little salt & pepper. If the leeks become too dry and start to stick add a small amount of vegetable stock to the pot.


When the leeks have cooked down, add the steamed cauliflower and mash the mixture with a potato masher. Add vegetable broth until the required consistency is obtained. If a creamier mash is desired, add soy, rice or coconut milk. Sample your mash and adjust the seasonings. Top with freshly cracked black pepper.

Isa's Puffy Pillow Pancakes


These fluffy light pancakes are the bomb! The recipe comes from my absolute vegan chef and cookbook author, Isa Chandra Moskowitz. Check out her website: Post Punk Kitchen for this and many other fantastic recipes.


Veggie Pizza


Yes, vegans eat pizza too! Making it yourself takes a little longer than buying a frozen one at Whole Foods, but your efforts will be rewarded with the fresh taste of all of your ingredients.

Ingredients
Dough (see link below to make your own)
Olive oil
1 small can of tomato sauce (you will only use a small amount. Freeze the rest)
Vegan cheese such as Daiya (totally optional)
Fresh veggies such as tomatoes & onions (sliced thin)
Peppers & olives (chopped)
Dried italian seasoning or fresh basil
Arugula leaves marinated in olive  oil & balsamic vinegar

Start out with your pizza dough which can be store made, whole wheat, gluten free, homemade, or any combination there of. I choose to make my own dough from this link for Perfect Vegan Pizza Crust. I cheated on the rising time and in fact, I only let it rise once but still ended up with a good quality airy crust.


Take your dough of choice and stretch it to conform to your pan. I used a 14 inch round pizza pan and could have easily gotten two thin crust pizzas out of this dough recipe instead of one thick one. Trial and error is what cooking is all about in my kitchen. Coat your dough with a light brushing of olive oil and then brush on a thin layer of tomato sauce. Plain old tomato sauce does the trick. The veggies will be the stars of this meal, no need to buy special sauce for this. Sprinkle lightly with the cheese. Top with thin slices of tomatoes and sprinkle with chopped onions, bell peppers, and olives. Sprinkle with dried Italian seasoning or fresh chopped basil. Pizza is what you make of it;  select good quality toppings and choose the veggies that you enjoy.

Bake in a 425 degree oven for about 20 minutes or until the crust is golden brown. Carefully slide onto a cutting board and let cool for a few minutes before slicing. Now comes my favorite part: top with fresh arugula that has been tossed in a little olive oil and balsamic vinegar. The contrast of the cooked vegetables and fresh marinated arugula is simply delightful. Well, it really it is. Try it and see. In fact I loved the veggies so much, my next pizza will be without cheese all together. I don't miss cheese at all, but it's nice to have the soy options around.


Monday, January 23, 2012

"Chicken" Portobello Stroganoff


With grey and gloomy weather outside, I longed for rich comfort food. Tonight's dinner consists of stroganoff made with chicken flavored seitan (say-tan) and portobello mushrooms on a bed of tri-color veggie fettucini. This is yet, another phenomenal recipe from Isa Chandra Moskowitz and can be found on her blog: Post Punk Kitchen.

I was short on time so I bought chicken flavored seitan made by WestSoy at Back to Basics, a natural foods grocery store. Seitan is a product that is made from wheat gluten flour. It can be flavored to taste like anything and has a  texture you can sink your teeth into.


Sunday, January 22, 2012

Vegan Mix Cupcakes


It's snowing outside and the roads are horrible, which only means that I am confined to this house and must therefore bake.

These chocolatey yummies actually come from a box mix and I have to say I am very impressed with their flavor and texture. The cakes are nice and light in texture and are not too sweet. The frosting is delicious and fluffy and works well in a pastry bag.  Espresso flavored sugar crystals add the finishing touch.

The best part is that these dairy, egg, and nut free mixes from Cherrybrook Kitchen are available in most supermarkets. They are great to have in the pantry when you need to whip up some emergency storm cupcakes.


Saturday, January 21, 2012

Frickin' Good Vegan Chili


Watch out boys and girls, this vegan chili will truly knock your socks off! This crock pot  recipe belongs to Paula Zsiray, the winner of Women's Day Best Vegetarian Chili Contest. The thick, spicy, chili features wheat berries (found near the rice and other grains in the market) which add taste and texture.

Thursday, January 19, 2012

Spuds &Salsa

What do you replace butter and sour cream with on your baked potato?

Salsa, of course! My fresh salsa is actually what Colombians call Aji  (AH-Hee) and can be used on just about anything.

Aji

2 large tomatoes, diced
2 bunches of scallions, chopped
1/2 a large white or red onion, chopped
A bunch of fresh cilantro, chopped
2-3 tablespoons vegetable oil
2-3 tablespoons red wine vinegar
The juice of one lime
Salt & pepper to taste
Tabasco sauce or Cholula sauce to taste

If the salsa is too acidic, add a teaspoon of sugar or ketchup.


Monday, January 16, 2012

Kale Tomato Soup


A great way to incorporate more greens into your diet is to add them to soups. Kale is high in vitamins A and C and also in calcium and iron.  Research has shown that the calcium from kale is absorbed into your body better than the calcium from dairy foods. 


Kale Soup


2-3 tablespoons of olive oil
2 leeks thoroughly washed and chopped
2 carrots, chopped
2 stalks of celery, chopped
2-3 cloves of chopped garlic
Salt & pepper


32 ounces of vegetable broth
28 ounce can of diced tomatoes


1 can of cannellini beans, washed & drained
1 large bunch of kale roughly chopped


Saute your vegetables on low heat in olive oil until softened. Don't skip this step. Salt & pepper to taste. Add the tomatoes and broth. Raise the heat to medium and bring to a simmer. Add your beans and Kale and only cook until the kale begins to wilt. Try not to over cook the kale.


Eat More Fruit!


It is winter in New England and the temperatures are in the single digits and many of my coworkers are sick.  I'll just strengthen my immune system by eating more organic fruits and veggies, and getting plenty of sleep and exercise. This has worked for me for the past 48 years.
Time for the disclaimer: I am not a doctor. I do not play one on TV. I did not stay in a Holiday Inn Express last night. The great thing about living in this country is the freedom and ability to do our own research and make our own choices regarding health and nutrition.

Sunday, January 15, 2012

Chickpeas on Arugula

This is a beautiful salad, if I do say so myself. This IS a beautiful salad!

Marinate chickpeas, elephant garlic, and fresh basil with a little EVOO and lemon juice. A little sea salt, fresh grated pepper, and nutritional yeast rounds out the flavor. Serve on a bed of arugula (High in vitamin C & vitamin A) with plum tomatoes. The peppery taste of the arugula marries with the fresh basil and garlic. YUM!

BTW, nutritional yeast is not the same thing as the yeast that you would use to leaven bread. It is used by vegans as a flavoring because of it's rich cheesy flavor and high content of B vitamins, especially B12.

Fruit Smoothie


 Feeling the winter blahs? Me too! Time to make a fruit smoothie with cut up pineapple, orange, grapefruit and strawberries. Plenty of vitamin C there for a little immune system boost. 

Friday, January 13, 2012

Chocolate Chip Cookies


Resolution? What resolution?

My vegan version of these cookies originates from Mattie's Chewy Chocolate Chip Cookies. I modified the recipe by adding 1/4 cup corn oil, and changing from all white sugar to one cup white and half a cup of brown. Crispy, chocolate, nirvana!


Tuesday, January 10, 2012

Lentil Loaf & Soup


Lentil soup is very hearty and filling, probably owing to the fact that lentils are high in protein and fiber. Unlike other dried beans, lentils cook up rather quickly.

Lentil Soup

1 package dried lentils, rinsed
32 ounces of vegetable stock
2 small carrots, diced
1/2 onion, diced
2 cloves garlic, chopped
1 medium potato, diced
1 small bunch of cilantro, chopped
Spices & salt

Spices can include a teaspoon of some or all of: cumin, coriander, turmeric, cayenne pepper, salt

Soak the lentils in water for about half an hour. Drain, rinse and place lentils in a large pot with the vegetable stock and bring heat up to medium. Add all your vegetables and spices and simmer for about 35 minutes until veggies and lentils are soft.

Lentil loaf is the perfect alternative to meatloaf. It not only looks good plated up, it tastes great and holds up well enough to put in a sandwich the next day.


Lentil Loaf

3 cups of lentil soup with most of the liquid drained
1 cup cooked brown rice
1/2 cup ketchup or 1/4 cup sriracha hot sauce
2-3 teaspoons vegan worchestire sauce

Mash lentils with a fork. Add rest of ingredients and mix well until all ingredients are incorporated. Cover loaf pan with parchment paper and press lentil mixture into loaf pan. Brush top with ketchup. Bake at 350 degrees for 30-40 minutes. Cool slightly before slicing.


Friday, January 6, 2012

Ultimate Vegan Brownies

 I know, it's the new year.  I know I have resolutions. I also know that giving up chocolate is very unrealistic and perhaps unnecessary for me. Once in a while I think a treat would be all right. So for all the other chocolate foodies in the house I bring to you another brownie recipe. This one is a tad easier and I have to confess, even more delicious. "Holy Chocolate Brownies, Batman", these are phenomenal!

Click on the link for the best brownies ever: Ultimate Brownies